Welcome to MMRotate’s documentation!
Learn the Basics
This chapter introduces the basic conception of rotated object detection and the framework of MMRotate, and provides links to detailed tutorials about MMRotate.
What is rotated object detection
Problem definition
Benefiting from the vigorous development of general object detection, most current rotated object detection models are based on classic general object detector. With the development of detection tasks, horizontal boxes have been unable to meet the needs of researchers in some subdivisions. We call it rotating object detection by redefining the object representation and increasing the number of regression degrees of freedom to achieve rotated rectangle, quadrilateral, and even arbitrary shape detection. Performing high-precision rotated object detection more efficiently has become a current research hotspot. The following areas are where rotated object detection has been applied or has great potential: face recognition, scene text, remote sensing, self-driving, medical, robotic grasping, etc.
What is rotated box
The most notable difference between rotated object detection and generic detection is the replacement of horizontal box annotations with rotated box annotations. They are defined as follows:
Horizontal box: A rectangle with the width along the x-axis and height along the y-axis. Usually, it can be represented by the coordinates of 2 diagonal vertices
(x_i, y_i)(i = 1, 2), or it can be represented by the coordinates of the center point and the height and width(x_center, y_center, height, width).Rotated box: It is obtained by rotating the horizontal box around the center point by an
angle, and the definition method of its rotated box is obtained by adding a radian parameter(x_center, y_center, height, width, theta), wheretheta = angle * pi / 180. The unit ofthetaisrad. When the rotation angle is a multiple of 90°, the rotated box degenerates into a horizontal box. The rotated box annotations exported by the annotation software are usually polygons, which need to be converted to the rotated box definition method before training.
Note
In MMRotate, angle parameters are in radians.
Rotation direction
A rotated box can be obtained by rotating a horizontal box clockwise or
counterclockwise around its center point. The rotation direction is closely
related to the choice of the coordinate system. The image space adopts the
right-handed coordinate system (y, x), where y is up->down and x is left->right.
There are two opposite directions of rotation:
Clockwise(CW)
Schematic of CW
0-------------------> x (0 rad)
|  A-------------B
|  |             |
|  |     box     h
|  |   angle=0   |
|  D------w------C
v
y (pi/2 rad)
Rotation matrix of CW
Rotation transformation of CW
Counterclockwise(CCW)
Schematic of CCW
0-------------------> x (0 rad)
|  A-------------B
|  |             |
|  |     box     h
|  |   angle=0   |
|  D------w------C
v
y (-pi/2 rad)
Rotation matrix of CCW
Rotation transformation of CCW
The operators that can set the rotation direction in MMCV are:
box_iou_rotated (Defaults to
CW)nms_rotated (Defaults to
CW)RoIAlignRotated (Defaults to
CCW)RiRoIAlignRotated (Defaults to
CCW).
Note
In MMRotate, the rotation direction of the rotated boxes is CW.
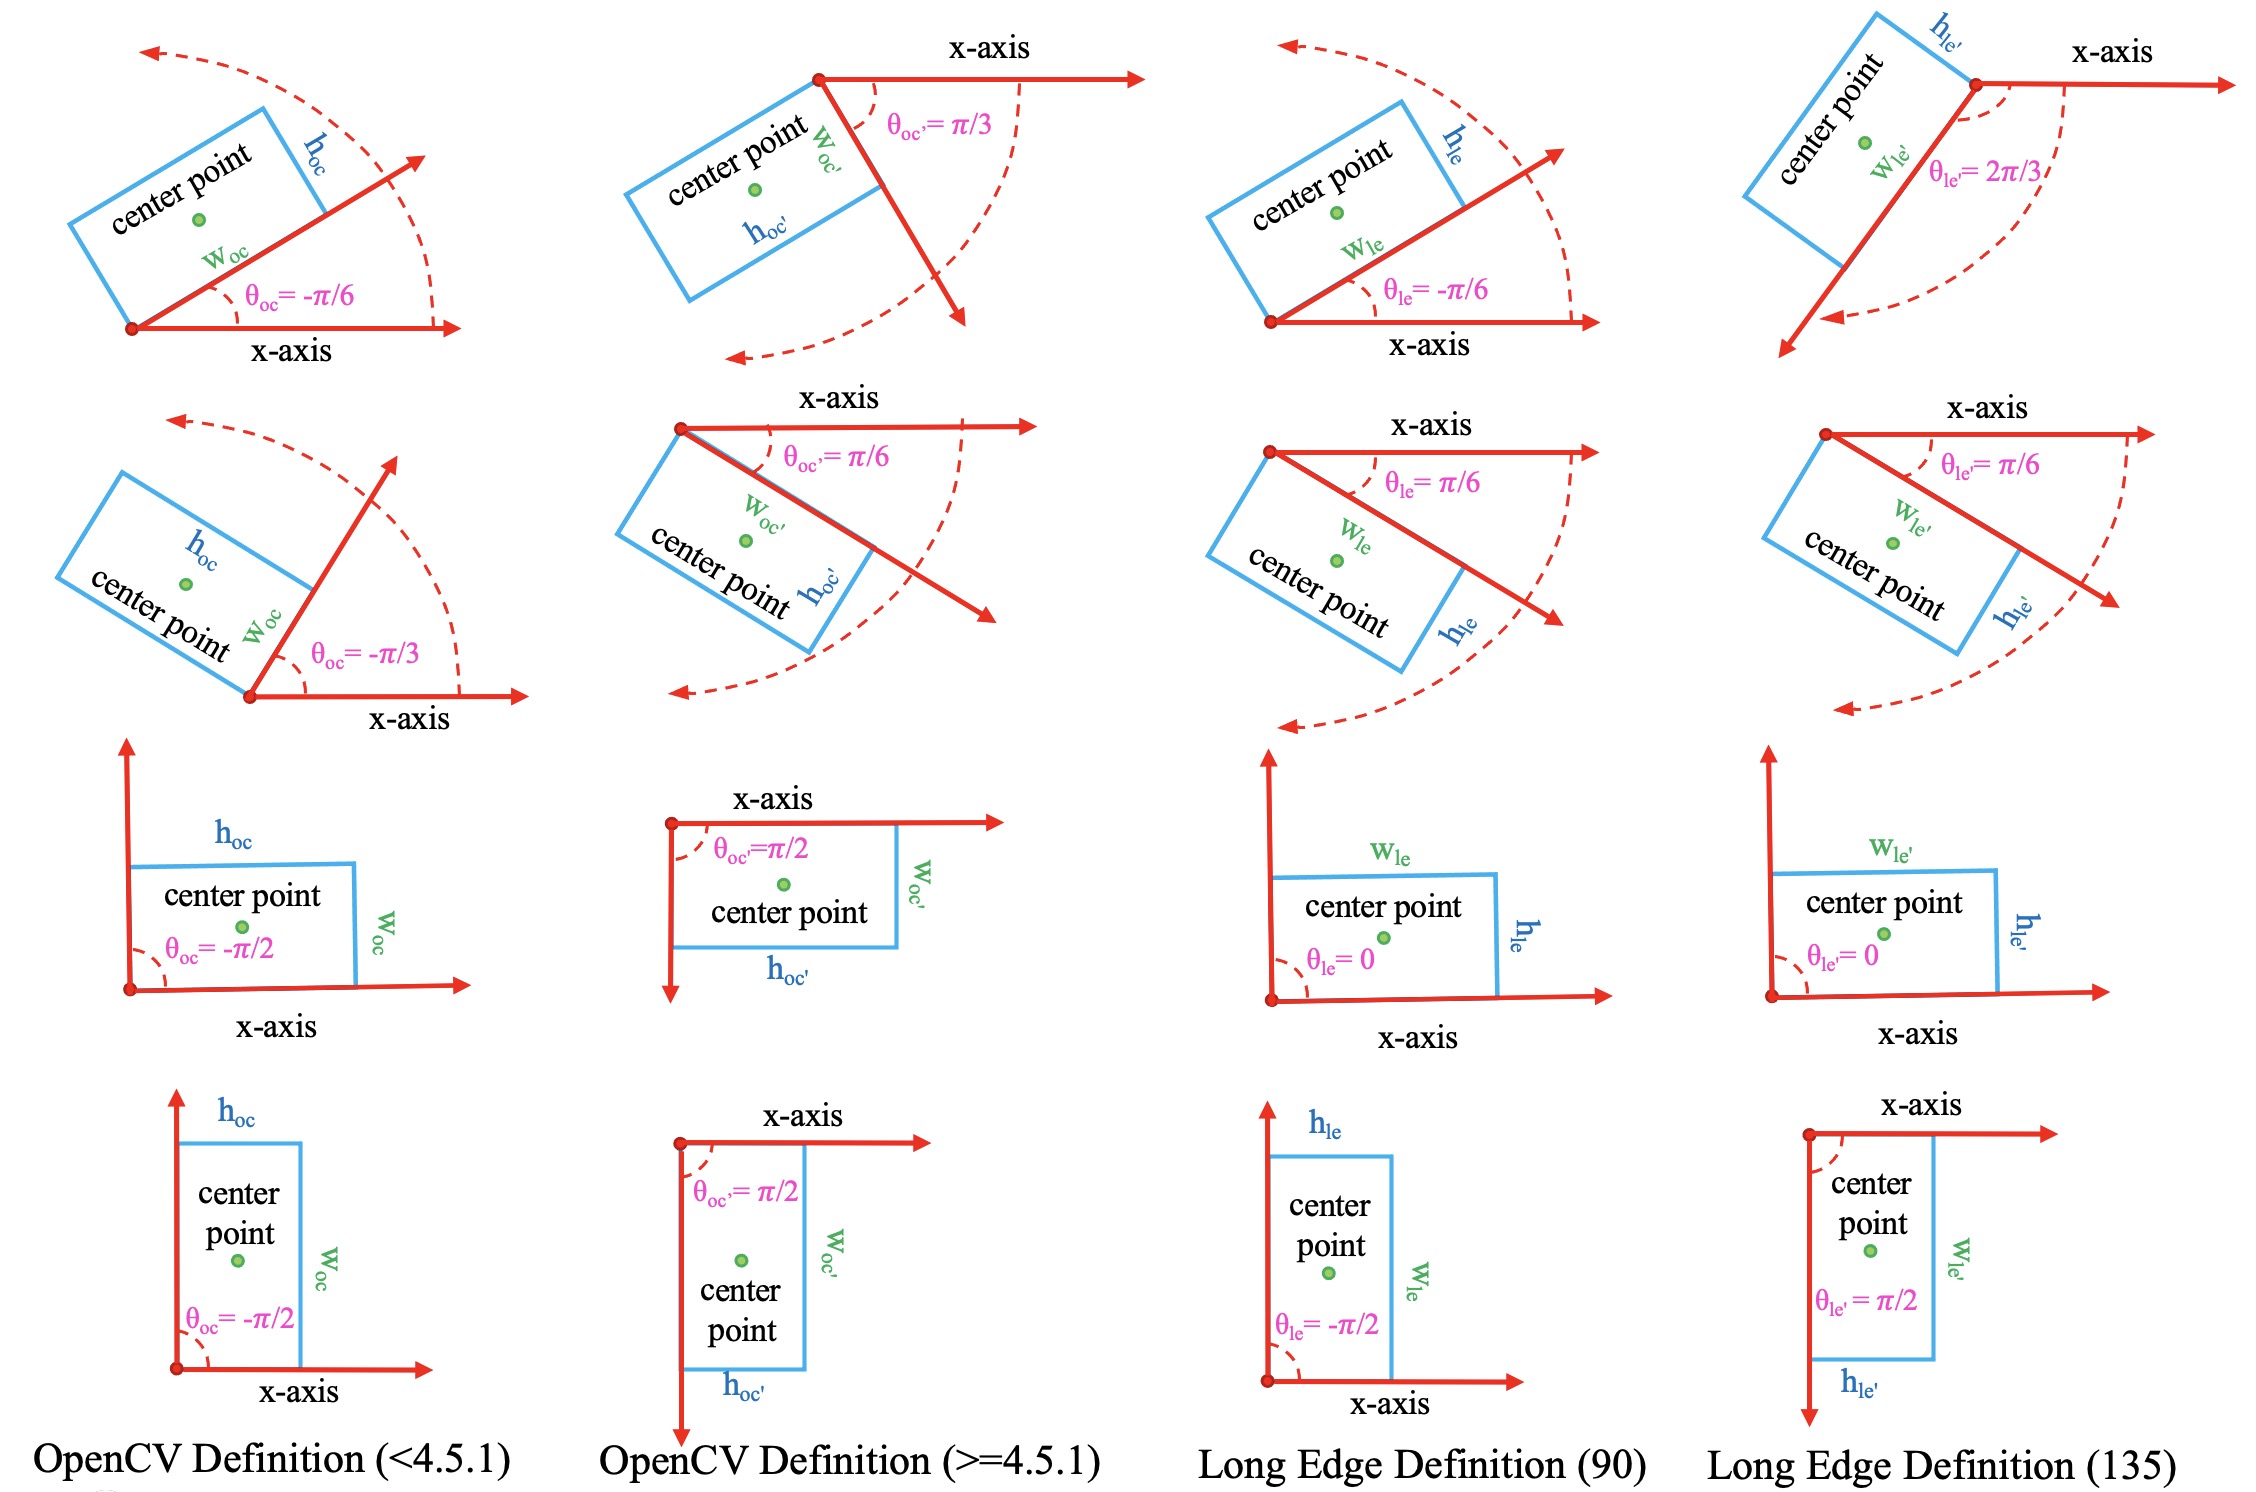
Definition of rotated box
Due to the difference in the definition range of theta, the following three
definitions of the rotated box gradually emerge in rotated object detection:
\(D_{oc^{\prime}}\): OpenCV Definition,
angle∈(0, 90°],theta∈(0, pi / 2], The angle between the height of the rectangle and the positive semi-axis of x is a positive acute angle. This definition comes from thecv2.minAreaRectfunction in OpenCV, which returns an angle in the range(0, 90°].\(D_{le135}\): Long Edge Definition (135°),
angle∈[-45°, 135°),theta∈[-pi / 4, 3 * pi / 4)andheight > width.\(D_{le90}\): Long Edge Definition (90°),
angle∈[-90°, 90°),theta∈[-pi / 2, pi / 2)andheight > width.
The conversion relationship between the three definitions is not involved in MMRotate, so we will not introduce it much more. Refer to the below blog to dive deeper.
Note
MMRotate supports the above three definitions of rotated box simultaneously, which can be flexibly switched through the configuration file.
It should be noted that if the OpenCV version is less than 4.5.1, the angle range
of cv2.minAreaRect is between [-90°, 0°). Reference
In order to facilitate the distinction, the old version of the OpenCV definition
is denoted as \(D_{oc}\).
\(D_{oc^{\prime}}\) : OpenCV definition,
opencv>=4.5.1,angle∈(0, 90°],theta∈(0, pi / 2].\(D_{oc}\) : Old OpenCV definition,
opencv<4.5.1,angle∈[-90°, 0°),theta∈[-pi / 2, 0).
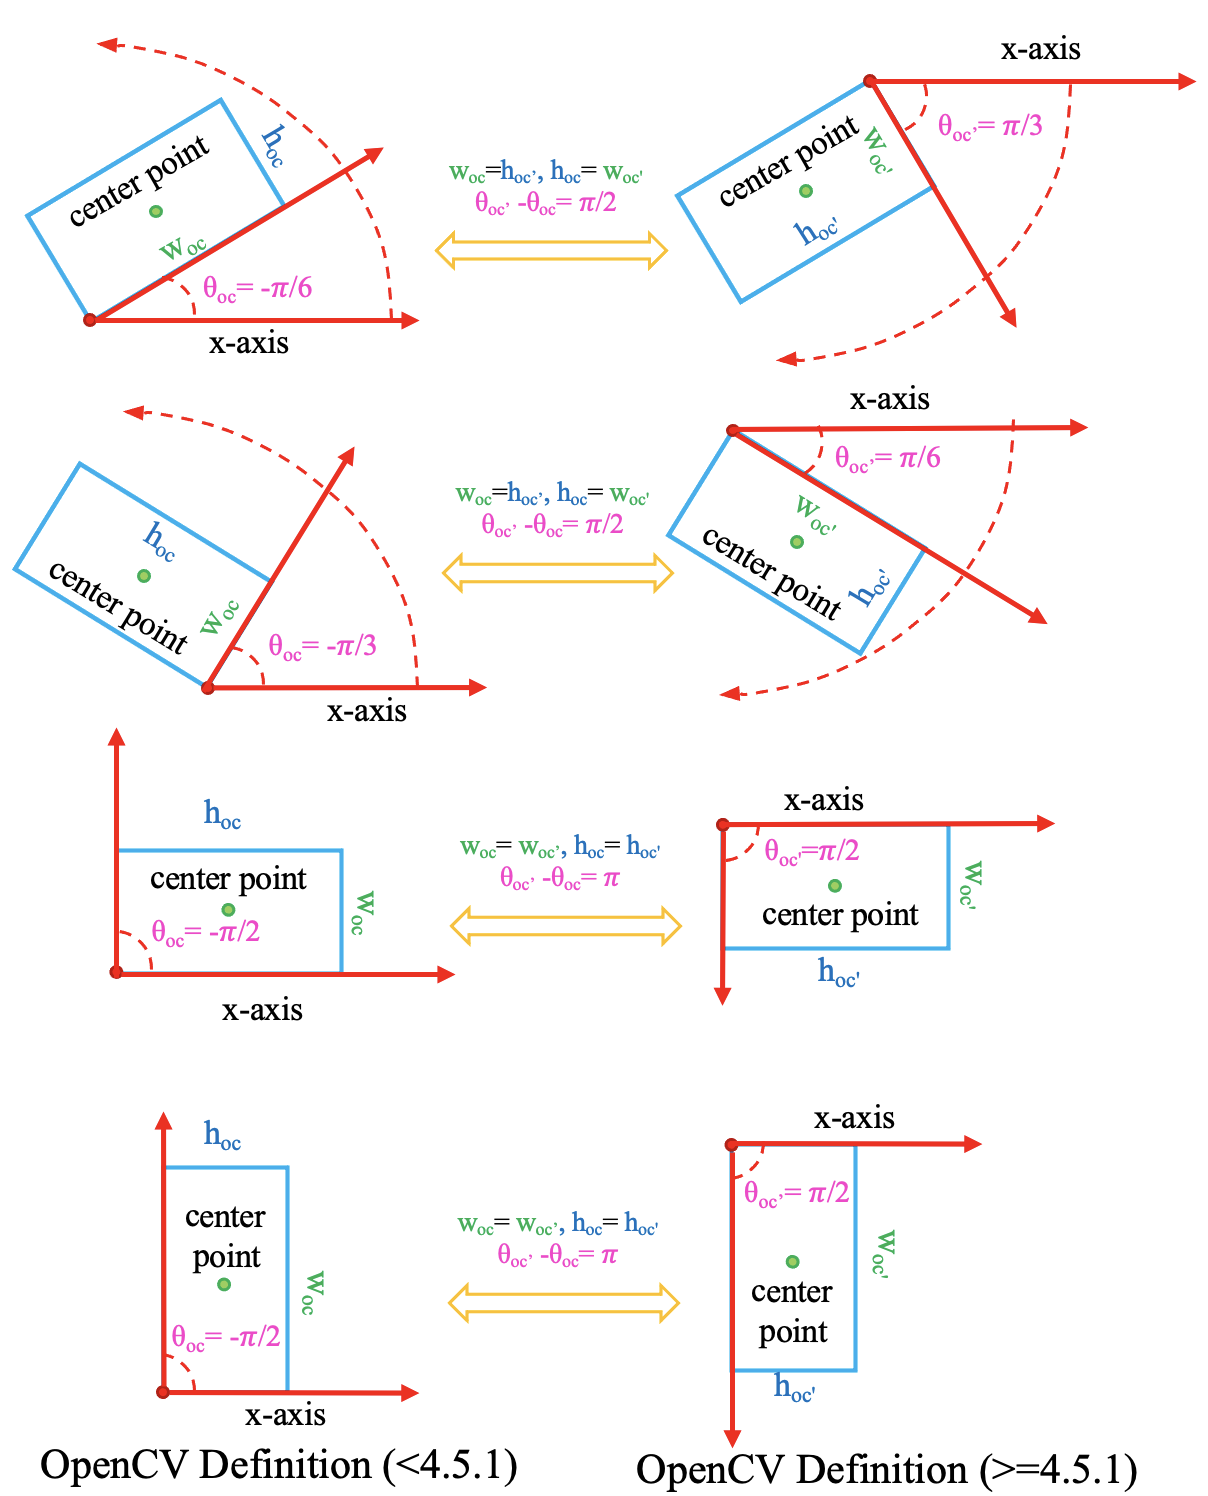
The conversion relationship between the two OpenCV definitions is as follows:
Note
Regardless of the OpenCV version you are using, MMRotate will convert the theta of the OpenCV definition to (0, pi / 2].
Evaluation
The code for evaluating mAP involves the calculation of IoU. We can directly calculate the IoU of the rotated boxes or convert the rotated boxes to a polygons and then calculate the polygons IoU (DOTA online evaluation uses the calculation of polygons IoU).
What is MMRotate
MMRotate is a toolbox that provides a framework for unified implementation and evaluation of rotated object detection, and below is its whole framework:
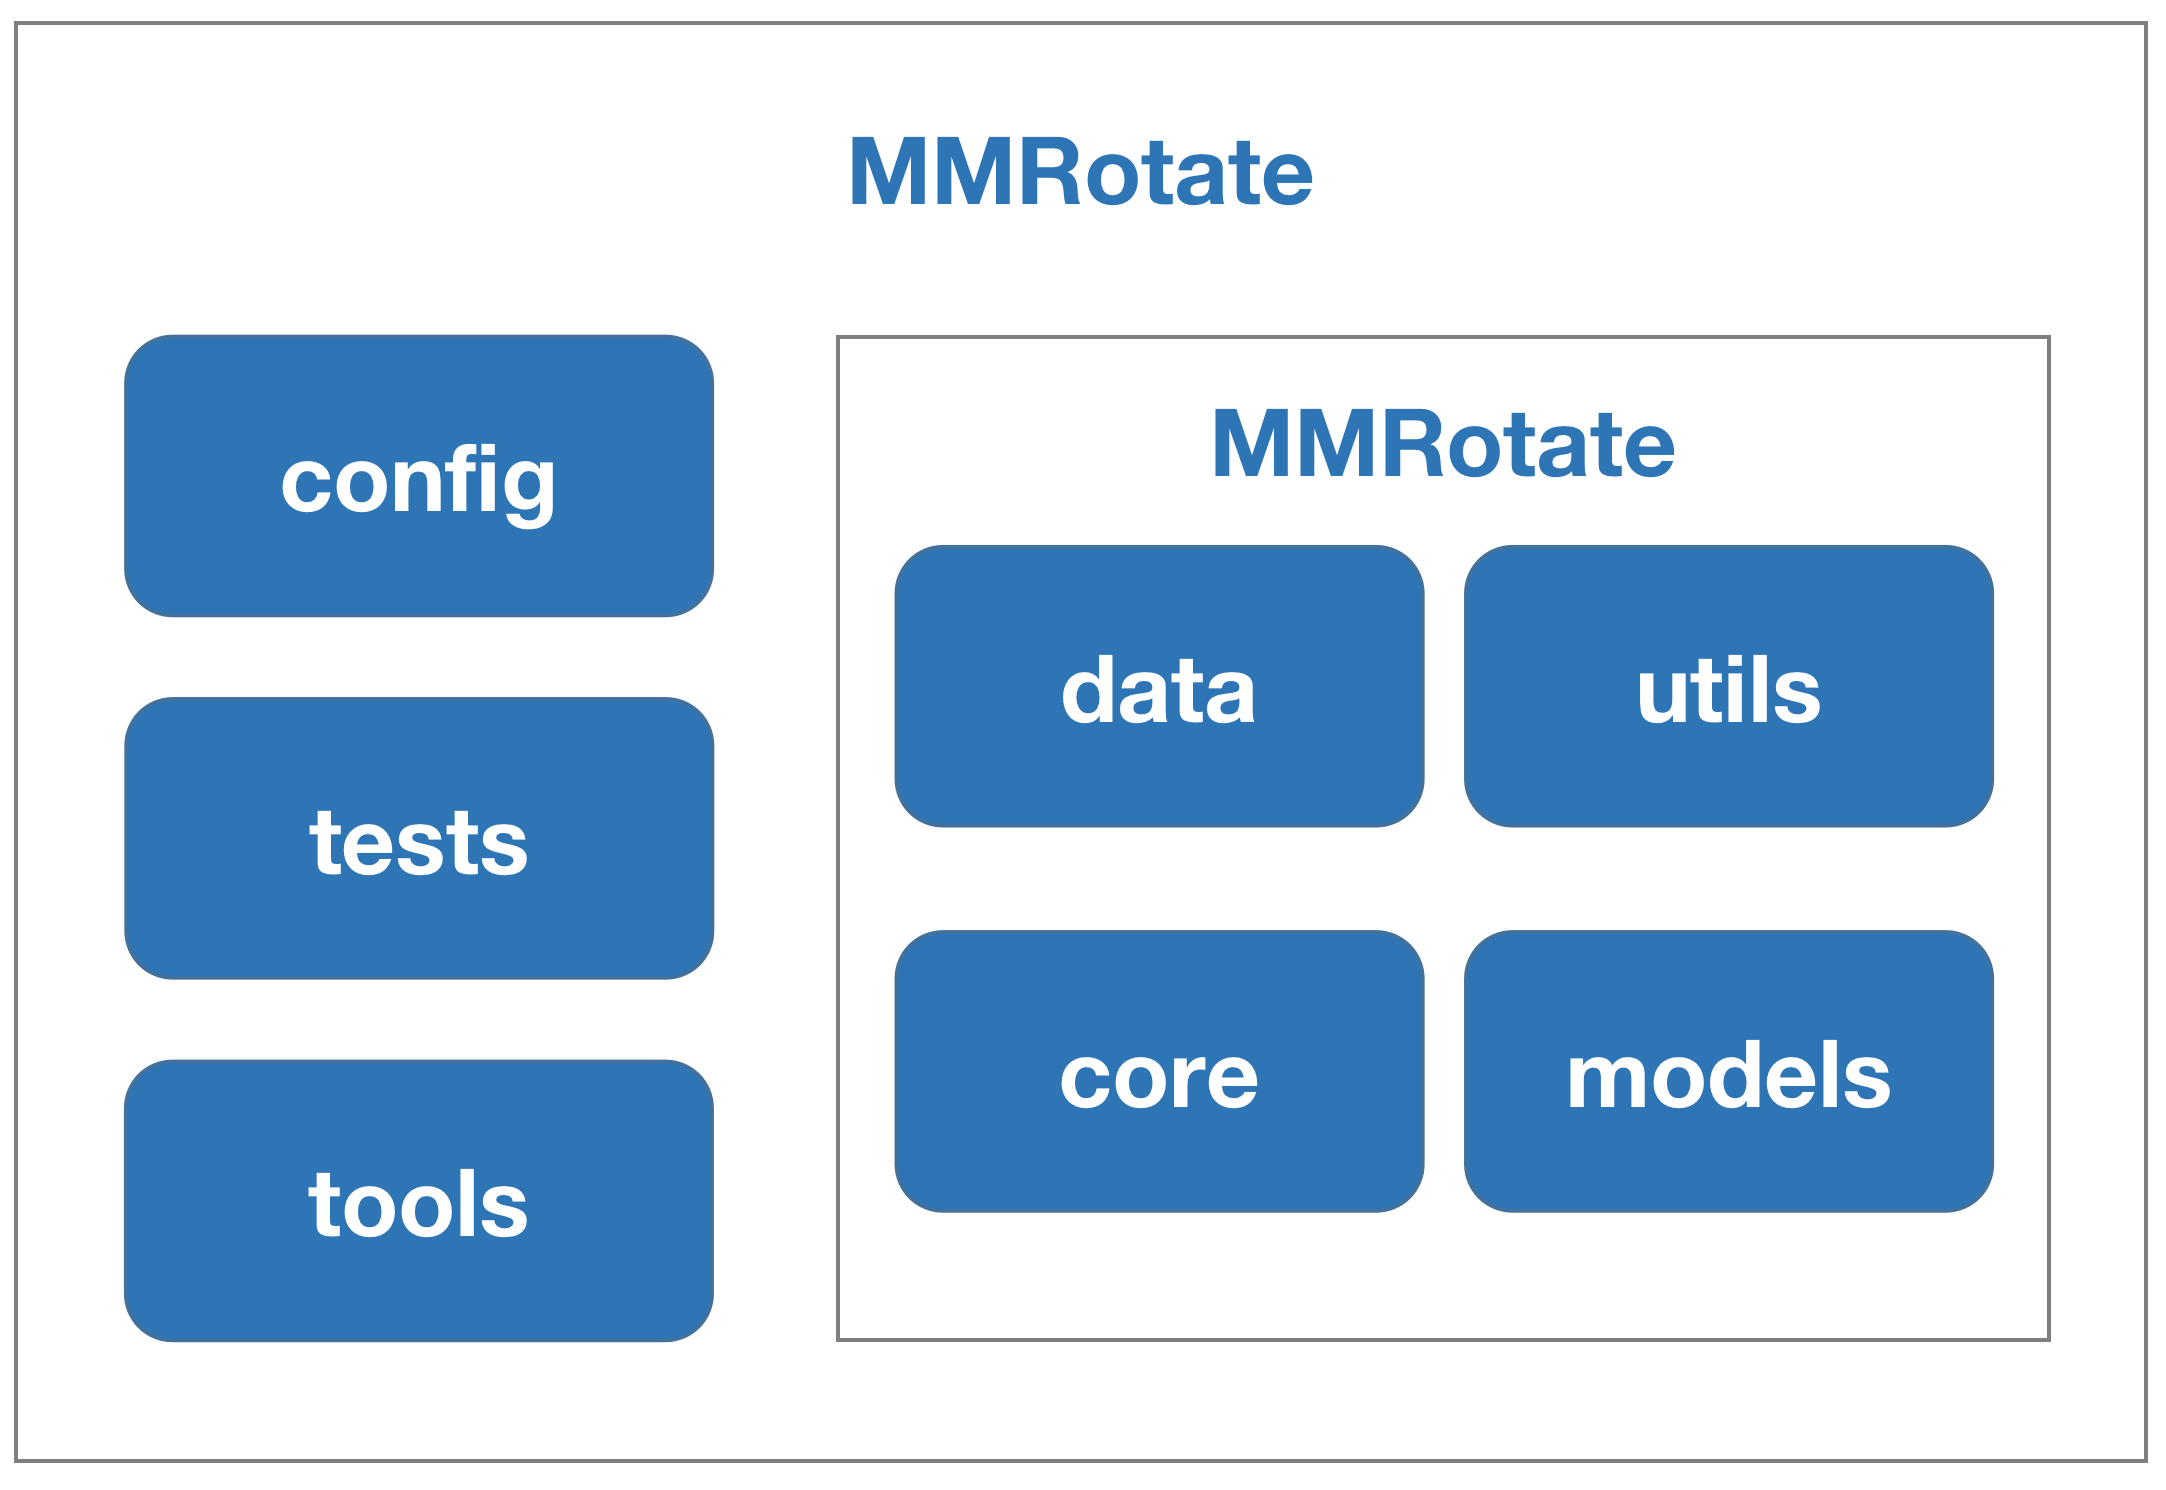
MMRotate consists of 4 main parts, datasets, models, core and apis.
datasetsis for data loading and data augmentation. In this part, we support various datasets for rotated object detection algorithms, useful data augmentation transforms inpipelinesfor pre-processing image.modelscontains models and loss functions.coreprovides evaluation tools for model training and evaluation.apisprovides high-level APIs for models training, testing, and inference.
The module design of MMRotate is as follows:
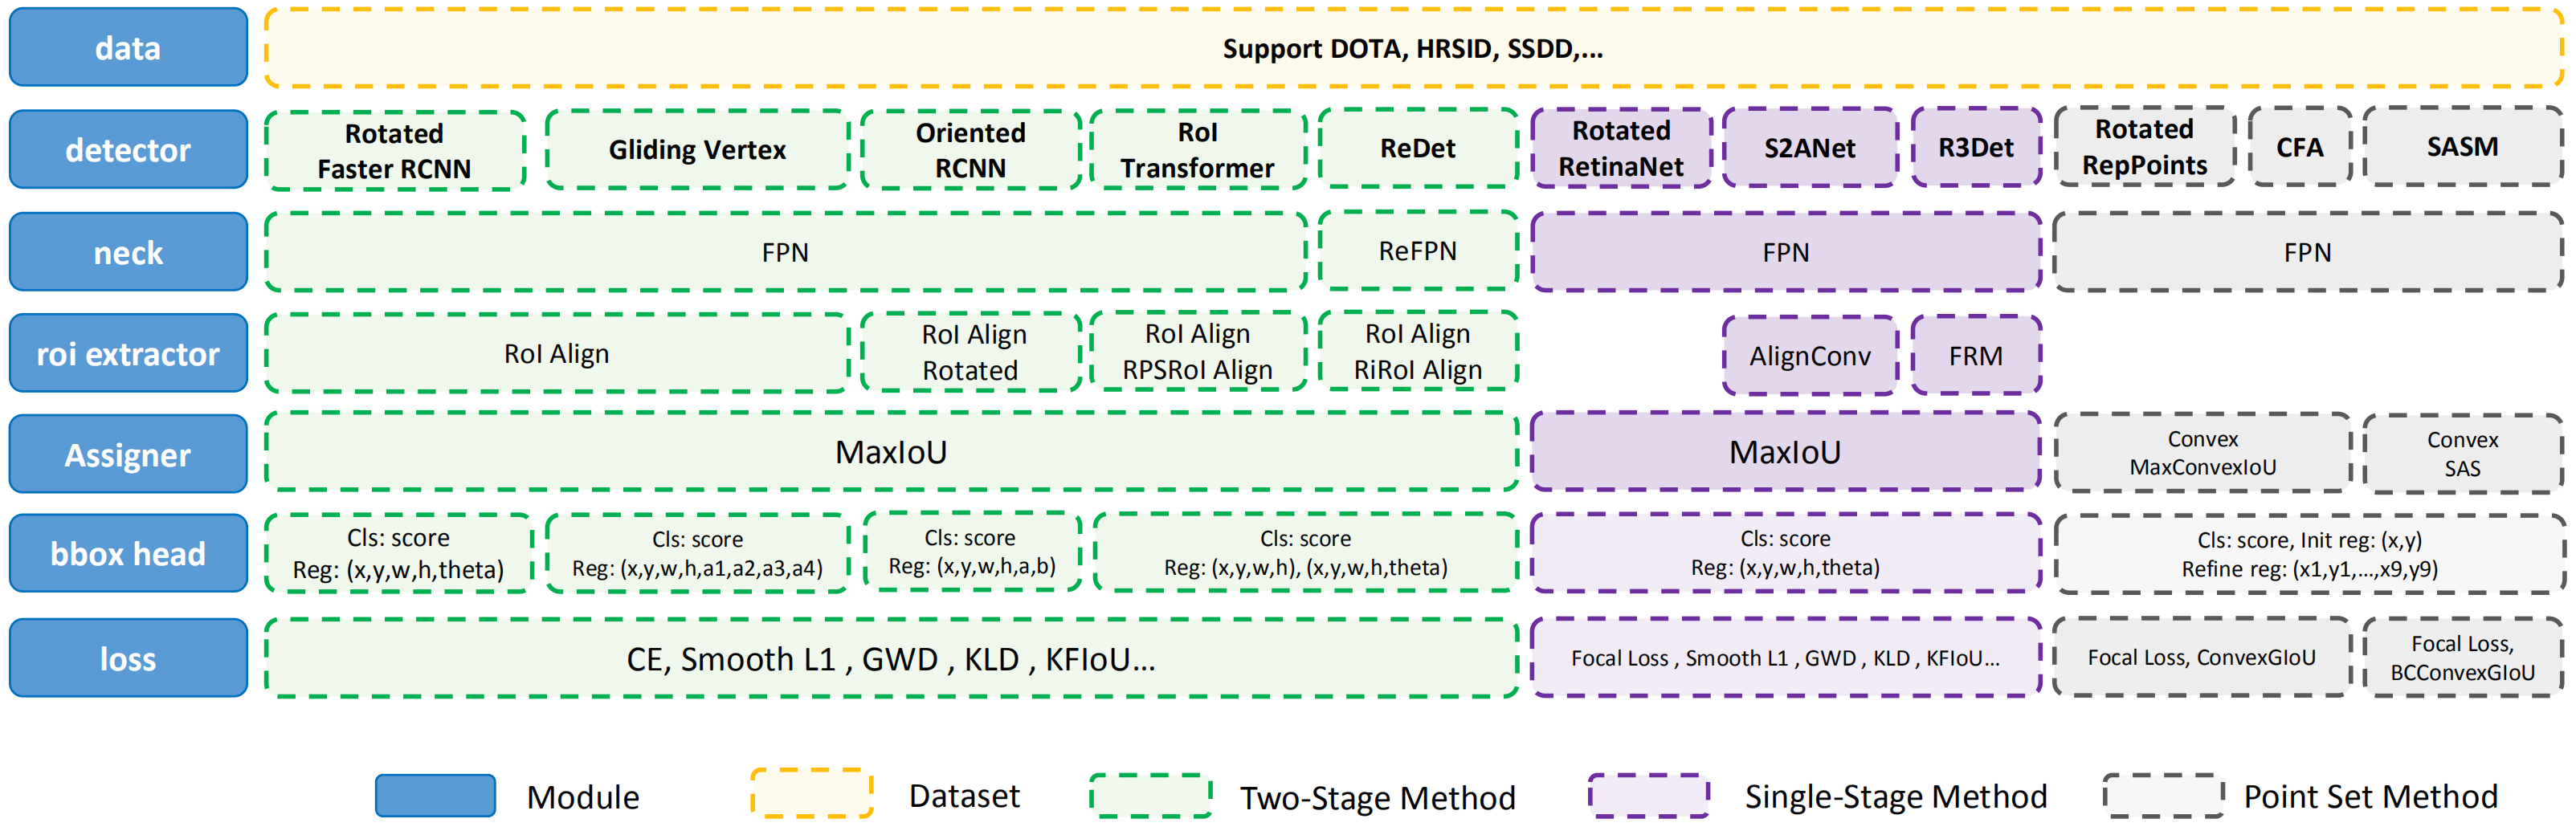
The following points need to be noted due to different definitions of rotated box:
Loading annotations
Data augmentation
Assigning samples
Evaluation
How to Use this Guide
Here is a detailed step-by-step guide to learn more about MMRotate:
For installation instructions, please see install.
get_started is for the basic usage of MMRotate.
Refer to the below tutorials to dive deeper:
Prerequisites
Compatible MMCV, MMClassification and MMDetection versions are shown as below. Please install the correct version of them to avoid installation issues.
| MMRotate version | MMCV version | MMDetection version |
|---|---|---|
| master | mmcv-full>=1.4.5 | mmdet >= 2.19.0 |
Note: You need to run pip uninstall mmcv first if you have mmcv installed.
If mmcv and mmcv-full are both installed, there will be ModuleNotFoundError.
Installation
Prepare environment
Create a conda virtual environment and activate it.
conda create -n openmmlab python=3.7 -y
conda activate openmmlab
Install PyTorch and torchvision following the official instructions, e.g.,
conda install pytorch torchvision -c pytorch
Note: Make sure that your compilation CUDA version and runtime CUDA version match. You can check the supported CUDA version for precompiled packages on the PyTorch website.
E.gIf you have CUDA 10.1 installed under/usr/local/cudaand would like to install PyTorch 1.7, you need to install the prebuilt PyTorch with CUDA 10.1.conda install pytorch==1.7.0 torchvision==0.8.0 cudatoolkit=10.1 -c pytorch
Install MMRotate
It is recommended to install MMRotate with MIM, which automatically handle the dependencies of OpenMMLab projects, including mmcv and other python packages.
pip install openmim
mim install mmrotate
Or you can still install MMRotate manually:
Install mmcv-full.
pip install mmcv-full -f https://download.openmmlab.com/mmcv/dist/{cu_version}/{torch_version}/index.html
Please replace
{cu_version}and{torch_version}in the url to your desired one. For example, to install the latestmmcv-fullwithCUDA 11.0andPyTorch 1.7.0, use the following command:pip install mmcv-full -f https://download.openmmlab.com/mmcv/dist/cu110/torch1.7.0/index.html
See here for different versions of MMCV compatible to different PyTorch and CUDA versions.
Optionally you can compile mmcv from source if you need to develop both mmcv and mmrotate. Refer to the guide for details.
Install MMDetection.
You can simply install mmdetection with the following command:
pip install mmdet
Install MMRotate.
You can simply install mmrotate with the following command:
pip install mmrotate
or clone the repository and then install it:
git clone https://github.com/open-mmlab/mmrotate.git
cd mmrotate
pip install -r requirements/build.txt
pip install -v -e .  # or "python setup.py develop"
Note:
a. When specifying -e or develop, MMRotate is installed on dev mode
, any local modifications made to the code will take effect without reinstallation.
b. If you would like to use opencv-python-headless instead of opencv-python,
you can install it before installing MMCV.
c. Some dependencies are optional. Simply running pip install -v -e . will
only install the minimum runtime requirements. To use optional dependencies like albumentations and imagecorruptions either install them manually with pip install -r requirements/optional.txt or specify desired extras when calling pip (e.g. pip install -v -e .[optional]). Valid keys for the extras field are: all, tests, build, and optional.
Another option: Docker Image
We provide a Dockerfile to build an image. Ensure that you are using docker version >=19.03.
# build an image with PyTorch 1.6, CUDA 10.1
docker build -t mmrotate docker/
Run it with
docker run --gpus all --shm-size=8g -it -v {DATA_DIR}:/mmrotate/data mmrotate
A from-scratch setup script
Assuming that you already have CUDA 10.1 installed, here is a full script for setting up MMDetection with conda.
conda create -n openmmlab python=3.7 -y
conda activate openmmlab

conda install pytorch==1.7.0 torchvision==0.8.0 cudatoolkit=10.1 -c pytorch

# install the latest mmcv
pip install mmcv-full -f https://download.openmmlab.com/mmcv/dist/cu101/torch1.7.0/index.html

# install mmdetection
pip install mmdet

# install mmrotate
git clone https://github.com/open-mmlab/mmrotate.git
cd mmrotate
pip install -r requirements/build.txt
pip install -v -e .  # or "python setup.py develop"
Verification
To verify whether MMRotate is installed correctly, we can run the demo code and inference a demo image.
Please refer to demo for more details. The demo code is supposed to run successfully upon you finish the installation.
Dataset Preparation
Please refer to data preparation for dataset preparation.
Test a model
single GPU
single node multiple GPU
multiple node
You can use the following commands to infer a dataset.
# single-gpu
python tools/test.py ${CONFIG_FILE} ${CHECKPOINT_FILE} [optional arguments]

# multi-gpu
./tools/dist_test.sh ${CONFIG_FILE} ${CHECKPOINT_FILE} ${GPU_NUM} [optional arguments]

# multi-node in slurm environment
python tools/test.py ${CONFIG_FILE} ${CHECKPOINT_FILE} [optional arguments] --launcher slurm
Examples:
Inference RotatedRetinaNet on DOTA-1.0 dataset. (Please change the data_root firstly.)
python ./tools/test.py \
  configs/rotated_retinanet/rotated_retinanet_obb_r50_fpn_1x_dota_le90.py \
  checkpoints/SOME_CHECKPOINT.pth --eval mAP
You can also visualize the results.
python ./tools/test.py \
  configs/rotated_retinanet/rotated_retinanet_obb_r50_fpn_1x_dota_le90.py \
  checkpoints/SOME_CHECKPOINT.pth \
  --show-dir work_dirs/vis
Further, you can also generate compressed files for online submission.
python ./tools/test.py  \
  configs/rotated_retinanet/rotated_retinanet_obb_r50_fpn_1x_dota_le90.py \
  checkpoints/SOME_CHECKPOINT.pth 1 --format-only \
  --eval-options submission_dir=work_dirs/Task1_results
Train a model
Train with a single GPU
python tools/train.py ${CONFIG_FILE} [optional arguments]
If you want to specify the working directory in the command, you can add an argument --work_dir ${YOUR_WORK_DIR}.
Train with multiple GPUs
./tools/dist_train.sh ${CONFIG_FILE} ${GPU_NUM} [optional arguments]
Optional arguments are:
--no-validate(not suggested): By default, the codebase will perform evaluation during the training. To disable this behavior, use--no-validate.--work-dir ${WORK_DIR}: Override the working directory specified in the config file.--resume-from ${CHECKPOINT_FILE}: Resume from a previous checkpoint file.
Difference between resume-from and load-from:
resume-from loads both the model weights and optimizer status, and the epoch is also inherited from the specified checkpoint. It is usually used for resuming the training process that is interrupted accidentally.
load-from only loads the model weights and the training epoch starts from 0. It is usually used for finetuning.
Train with multiple machines
If you run MMRotate on a cluster managed with slurm, you can use the script slurm_train.sh. (This script also supports single machine training.)
[GPUS=${GPUS}] ./tools/slurm_train.sh ${PARTITION} ${JOB_NAME} ${CONFIG_FILE} ${WORK_DIR}
If you have just multiple machines connected with ethernet, you can refer to PyTorch launch utility. Usually it is slow if you do not have high speed networking like InfiniBand.
Launch multiple jobs on a single machine
If you launch multiple jobs on a single machine, e.g., 2 jobs of 4-GPU training on a machine with 8 GPUs, you need to specify different ports (29500 by default) for each job to avoid communication conflict.
If you use dist_train.sh to launch training jobs, you can set the port in commands.
CUDA_VISIBLE_DEVICES=0,1,2,3 PORT=29500 ./tools/dist_train.sh ${CONFIG_FILE} 4
CUDA_VISIBLE_DEVICES=4,5,6,7 PORT=29501 ./tools/dist_train.sh ${CONFIG_FILE} 4
If you use launch training jobs with Slurm, you need to modify the config files (usually the 6th line from the bottom in config files) to set different communication ports.
In config1.py,
dist_params = dict(backend='nccl', port=29500)
In config2.py,
dist_params = dict(backend='nccl', port=29501)
Then you can launch two jobs with config1.py ang config2.py.
CUDA_VISIBLE_DEVICES=0,1,2,3 GPUS=4 ./tools/slurm_train.sh ${PARTITION} ${JOB_NAME} config1.py ${WORK_DIR}
CUDA_VISIBLE_DEVICES=4,5,6,7 GPUS=4 ./tools/slurm_train.sh ${PARTITION} ${JOB_NAME} config2.py ${WORK_DIR}
Benchmark and Model Zoo
Rotated RetinaNet-OBB/HBB (ICCV’2017)
Rotated FasterRCNN-OBB (TPAMI’2017)
Rotated RepPoints-OBB (ICCV’2019)
RoI Transformer (CVPR’2019)
Gliding Vertex (TPAMI’2020)
R3Det (AAAI’2021)
S2A-Net (TGRS’2021)
ReDet (CVPR’2021)
Beyond Bounding-Box (CVPR’2021)
Oriented R-CNN (ICCV’2021)
GWD (ICML’2021)
KLD (NeurIPS’2021)
SASM (AAAI’2022)
KFIoU (arXiv)
G-Rep (stay tuned)
Results on DOTA v1.0
| Backbone | mAP | Angle | lr schd | Mem (GB) | Inf Time (fps) | Aug | Batch Size | Configs | Download |
|---|---|---|---|---|---|---|---|---|---|
| ResNet50 (1024,1024,200) | 59.44 | oc | 1x | 3.45 | 15.9 | - | 2 | rotated_reppoints_r50_fpn_1x_dota_oc | model | log |
| ResNet50 (1024,1024,200) | 64.55 | oc | 1x | 3.38 | 14.8 | - | 2 | rotated_retinanet_hbb_r50_fpn_1x_dota_oc | model | log |
| ResNet50 (1024,1024,200) | 66.45 | oc | 1x | 3.53 | 15.7 | - | 2 | sasm_reppoints_r50_fpn_1x_dota_oc | model | log |
| ResNet50 (1024,1024,200) | 68.42 | le90 | 1x | 3.38 | 16.2 | - | 2 | rotated_retinanet_obb_r50_fpn_1x_dota_le90 | model | log |
| ResNet50 (1024,1024,200) | 69.49 | le135 | 1x | 4.05 | 10.5 | - | 2 | g_reppoints_r50_fpn_1x_dota_le135 | model | log |
| ResNet50 (1024,1024,200) | 69.55 | oc | 1x | 3.39 | 14.8 | - | 2 | rotated_retinanet_hbb_gwd_r50_fpn_1x_dota_oc | model | log |
| ResNet50 (1024,1024,200) | 69.60 | le90 | 1x | 3.38 | 14.8 | - | 2 | rotated_retinanet_hbb_kfiou_r50_fpn_1x_dota_le90 | model | log |
| ResNet50 (1024,1024,200) | 69.63 | le135 | 1x | 3.45 | 15.7 | - | 2 | cfa_r50_fpn_1x_dota_le135 | model | log |
| ResNet50 (1024,1024,200) | 69.76 | oc | 1x | 3.39 | 15.1 | - | 2 | rotated_retinanet_hbb_kfiou_r50_fpn_1x_dota_oc | model | log |
| ResNet50 (1024,1024,200) | 69.77 | le135 | 1x | 3.38 | 15.1 | - | 2 | rotated_retinanet_hbb_kfiou_r50_fpn_1x_dota_le135 | model | log |
| ResNet50 (1024,1024,200) | 69.79 | le135 | 1x | 3.38 | 16.6 | - | 2 | rotated_retinanet_obb_r50_fpn_1x_dota_le135 | model | log |
| ResNet50 (1024,1024,200) | 69.80 | oc | 1x | 3.54 | 12.1 | - | 2 | r3det_r50_fpn_1x_dota_oc | model | log |
| ResNet50 (1024,1024,200) | 69.94 | oc | 1x | 3.39 | 14.9 | - | 2 | rotated_retinanet_hbb_kld_r50_fpn_1x_dota_oc | model | log |
| ResNet50 (1024,1024,200) | 70.18 | oc | 1x | 3.23 | 15.1 | - | 2 | r3det_tiny_r50_fpn_1x_dota_oc | model | log |
| ResNet50 (1024,1024,200) | 71.83 | oc | 1x | 3.54 | 12.2 | - | 2 | r3det_kld_r50_fpn_1x_dota_oc | model | log |
| ResNet50 (1024,1024,200) | 72.68 | oc | 1x | 3.62 | 12.2 | - | 2 | r3det_kfiou_ln_r50_fpn_1x_dota_oc | model | log |
| ResNet50 (1024,1024,200) | 72.76 | oc | 1x | 3.44 | 13.6 | - | 2 | r3det_tiny_kld_r50_fpn_1x_dota_oc | model | log |
| ResNet50 (1024,1024,200) | 73.23 | le90 | 1x | 8.45 | 15.6 | - | 2 | gliding_vertex_r50_fpn_1x_dota_le90 | model | log |
| ResNet50 (1024,1024,200) | 73.40 | le90 | 1x | 8.46 | 16.0 | - | 2 | rotated_faster_rcnn_r50_fpn_1x_dota_le90 | model | log |
| ResNet50 (1024,1024,200) | 73.45 | oc | 40e | 3.45 | 15.7 | - | 2 | cfa_r50_fpn_40e_dota_oc | model | log |
| ResNet50 (1024,1024,200) | 73.91 | le135 | 1x | 3.14 | 15.3 | - | 2 | s2anet_r50_fpn_1x_dota_le135 | model | log |
| ResNet50 (1024,1024,200) | 75.69 | le90 | 1x | 8.46 | 15.3 | - | 2 | oriented_rcnn_r50_fpn_1x_dota_le90 | model | log |
| ResNet50 (1024,1024,200) | 76.08 | le90 | 1x | 8.67 | 13.5 | - | 2 | roi_trans_r50_fpn_1x_dota_le90 | model | log |
| ResNet50 (1024,1024,200) | 76.50 | le90 | 1x | 16.7 | MS+RR | 2 | rotated_retinanet_obb_r50_fpn_1x_dota_ms_rr_le90 | model | log | |
| ReResNet50 (1024,1024,200) | 76.68 | le90 | 1x | 9.32 | 4.0 | - | 2 | redet_re50_refpn_1x_dota_le90 | model | log |
| Swin-tiny (1024,1024,200) | 77.51 | le90 | 1x | 10.6 | - | 2 | roi_trans_swin_tiny_fpn_1x_dota_le90 | model | log | |
| ResNet50 (1024,1024,200) | 79.66 | le90 | 1x | 13.7 | MS+RR | 2 | roi_trans_r50_fpn_1x_dota_ms_le90 | model | log | |
| ReResNet50 (1024,1024,200) | 79.87 | le90 | 1x | 4.0 | MS+RR | 2 | redet_re50_refpn_1x_dota_ms_rr_le90 | model | log |
MSmeans multiple scale image split.RRmeans random rotation.
The above models are trained with 1 * 1080Ti and inferred with 1 * 2080Ti.
Tutorial 1: Learn about Configs
We incorporate modular and inheritance design into our config system, which is convenient to conduct various experiments.
If you wish to inspect the config file, you may run python tools/misc/print_config.py /PATH/TO/CONFIG to see the complete config.
The mmrotate is built upon the mmdet,
thus it is highly recommended learning the basic of mmdet.
Modify a config through script arguments
When submitting jobs using “tools/train.py” or “tools/test.py”, you may specify --cfg-options to in-place modify the config.
Update config keys of dict chains.
The config options can be specified following the order of the dict keys in the original config. For example,
--cfg-options model.backbone.norm_eval=Falsechanges the all BN modules in model backbones totrainmode.Update keys inside a list of configs.
Some config dicts are composed as a list in your config. For example, the training pipeline
data.train.pipelineis normally a list e.g.[dict(type='LoadImageFromFile'), ...]. If you want to change'LoadImageFromFile'to'LoadImageFromWebcam'in the pipeline, you may specify--cfg-options data.train.pipeline.0.type=LoadImageFromWebcam.Update values of list/tuples.
If the value to be updated is a list or a tuple. For example, the config file normally sets
workflow=[('train', 1)]. If you want to change this key, you may specify--cfg-options workflow="[(train,1),(val,1)]". Note that the quotation mark ” is necessary to support list/tuple data types, and that NO white space is allowed inside the quotation marks in the specified value.
Config file naming convention
We follow the below style to name config files. Contributors are advised to follow the same style.
{model}_[model setting]_{backbone}_{neck}_[norm setting]_[misc]_[gpu x batch_per_gpu]_{dataset}_{data setting}_{angle version}
{xxx} is required field and [yyy] is optional.
{model}: model type likerotated_faster_rcnn,rotated_retinanet, etc.[model setting]: specific setting for some model, likehbbforrotated_retinanet, etc.{backbone}: backbone type liker50(ResNet-50),swin_tiny(SWIN-tiny).{neck}: neck type likefpn,refpn.[norm_setting]:bn(Batch Normalization) is used unless specified, other norm layer type could begn(Group Normalization),syncbn(Synchronized Batch Normalization).gn-head/gn-neckindicates GN is applied in head/neck only, whilegn-allmeans GN is applied in the entire model, e.g. backbone, neck, head.[misc]: miscellaneous setting/plugins of model, e.g.dconv,gcb,attention,albu,mstrain.[gpu x batch_per_gpu]: GPUs and samples per GPU,1xb2is used by default.{dataset}: dataset likedota.{angle version}: likeoc,le135orle90.
An example of RotatedRetinaNet
To help the users have a basic idea of a complete config and the modules in a modern detection system, we make brief comments on the config of RotatedRetinaNet using ResNet50 and FPN as the following. For more detailed usage and the corresponding alternative for each modules, please refer to the API documentation.
angle_version = 'oc'  # The angle version
model = dict(
    type='RotatedRetinaNet',  # The name of detector
    backbone=dict(  # The config of backbone
        type='ResNet',  # The type of the backbone
        depth=50,  # The depth of backbone
        num_stages=4,  # Number of stages of the backbone.
        out_indices=(0, 1, 2, 3),  # The index of output feature maps produced in each stages
        frozen_stages=1,  # The weights in the first 1 stage are fronzen
        zero_init_residual=False,  # Whether to use zero init for last norm layer in resblocks to let them behave as identity.
        norm_cfg=dict(  # The config of normalization layers.
            type='BN',  # Type of norm layer, usually it is BN or GN
            requires_grad=True),  # Whether to train the gamma and beta in BN
        norm_eval=True,  # Whether to freeze the statistics in BN
        style='pytorch',  # The style of backbone, 'pytorch' means that stride 2 layers are in 3x3 conv, 'caffe' means stride 2 layers are in 1x1 convs.
        init_cfg=dict(type='Pretrained', checkpoint='torchvision://resnet50')),  # The ImageNet pretrained backbone to be loaded
    neck=dict(
        type='FPN',  # The neck of detector is FPN. We also support 'ReFPN'
        in_channels=[256, 512, 1024, 2048],  # The input channels, this is consistent with the output channels of backbone
        out_channels=256,  # The output channels of each level of the pyramid feature map
        start_level=1,  # Index of the start input backbone level used to build the feature pyramid
        add_extra_convs='on_input',  # It specifies the source feature map of the extra convs
        num_outs=5),  # The number of output scales
    bbox_head=dict(
        type='RotatedRetinaHead',# The type of bbox head is 'RRetinaHead'
        num_classes=15,  # Number of classes for classification
        in_channels=256,  # Input channels for bbox head
        stacked_convs=4,  # Number of stacking convs of the head
        feat_channels=256,  # Number of hidden channels
        assign_by_circumhbbox='oc',  # The angle version of obb2hbb
        anchor_generator=dict(  # The config of anchor generator
            type='RotatedAnchorGenerator',  # The type of anchor generator
            octave_base_scale=4,  # The base scale of octave.
            scales_per_octave=3,  #  Number of scales for each octave.
            ratios=[1.0, 0.5, 2.0],  # The ratio between height and width.
            strides=[8, 16, 32, 64, 128]),  # The strides of the anchor generator. This is consistent with the FPN feature strides.
        bbox_coder=dict(  # Config of box coder to encode and decode the boxes during training and testing
            type='DeltaXYWHAOBBoxCoder',  # Type of box coder.
            angle_range='oc',  # The angle version of box coder.
            norm_factor=None,  # The norm factor of box coder.
            edge_swap=False,  # The edge swap flag of box coder.
            proj_xy=False,  # The project flag of box coder.
            target_means=(0.0, 0.0, 0.0, 0.0, 0.0),  # The target means used to encode and decode boxes
            target_stds=(1.0, 1.0, 1.0, 1.0, 1.0)),  # The standard variance used to encode and decode boxes
        loss_cls=dict(  # Config of loss function for the classification branch
            type='FocalLoss',  # Type of loss for classification branch
            use_sigmoid=True,  #  Whether the prediction is used for sigmoid or softmax
            gamma=2.0,  # The gamma for calculating the modulating factor
            alpha=0.25,  # A balanced form for Focal Loss
            loss_weight=1.0),  # Loss weight of the classification branch
        loss_bbox=dict(  # Config of loss function for the regression branch
            type='L1Loss',  # Type of loss
            loss_weight=1.0)),  # Loss weight of the regression branch
    train_cfg=dict(  # Config of training hyperparameters
        assigner=dict(  # Config of assigner
            type='MaxIoUAssigner',  # Type of assigner
            pos_iou_thr=0.5,  # IoU >= threshold 0.5 will be taken as positive samples
            neg_iou_thr=0.4,  # IoU < threshold 0.4 will be taken as negative samples
            min_pos_iou=0,  # The minimal IoU threshold to take boxes as positive samples
            ignore_iof_thr=-1,  # IoF threshold for ignoring bboxes
            iou_calculator=dict(type='RBboxOverlaps2D')),  # Type of Calculator for IoU
        allowed_border=-1,  # The border allowed after padding for valid anchors.
        pos_weight=-1,  # The weight of positive samples during training.
        debug=False),  # Whether to set the debug mode
    test_cfg=dict(  # Config of testing hyperparameters
        nms_pre=2000,  # The number of boxes before NMS
        min_bbox_size=0,  # The allowed minimal box size
        score_thr=0.05,  # Threshold to filter out boxes
        nms=dict(iou_thr=0.1), # NMS threshold
        max_per_img=2000))  # The number of boxes to be kept after NMS.
dataset_type = 'DOTADataset'  # Dataset type, this will be used to define the dataset
data_root = '../datasets/split_1024_dota1_0/'  # Root path of data
img_norm_cfg = dict(  # Image normalization config to normalize the input images
    mean=[123.675, 116.28, 103.53],  # Mean values used to pre-training the pre-trained backbone models
    std=[58.395, 57.12, 57.375],  # Standard variance used to pre-training the pre-trained backbone models
    to_rgb=True)  # The channel orders of image used to pre-training the pre-trained backbone models
train_pipeline = [  # Training pipeline
    dict(type='LoadImageFromFile'),  # First pipeline to load images from file path
    dict(type='LoadAnnotations',  # Second pipeline to load annotations for current image
         with_bbox=True),  # Whether to use bounding box, True for detection
    dict(type='RResize',  # Augmentation pipeline that resize the images and their annotations
         img_scale=(1024, 1024)),  # The largest scale of image
    dict(type='RRandomFlip',  # Augmentation pipeline that flip the images and their annotations
         flip_ratio=0.5,  # The ratio or probability to flip
         version='oc'),  # The angle version
    dict(
        type='Normalize',  # Augmentation pipeline that normalize the input images
        mean=[123.675, 116.28, 103.53],  # These keys are the same of img_norm_cfg since the
        std=[58.395, 57.12, 57.375],  # keys of img_norm_cfg are used here as arguments
        to_rgb=True),
    dict(type='Pad',  # Padding config
         size_divisor=32),  # The number the padded images should be divisible
    dict(type='DefaultFormatBundle'),  # Default format bundle to gather data in the pipeline
    dict(type='Collect',  # Pipeline that decides which keys in the data should be passed to the detector
         keys=['img', 'gt_bboxes', 'gt_labels'])
]
test_pipeline = [
    dict(type='LoadImageFromFile'),  # First pipeline to load images from file path
    dict(
        type='MultiScaleFlipAug',  # An encapsulation that encapsulates the testing augmentations
        img_scale=(1024, 1024),  # Decides the largest scale for testing, used for the Resize pipeline
        flip=False,  # Whether to flip images during testing
        transforms=[
            dict(type='RResize'),  # Use resize augmentation
            dict(
                type='Normalize',  # Normalization config, the values are from img_norm_cfg
                mean=[123.675, 116.28, 103.53],
                std=[58.395, 57.12, 57.375],
                to_rgb=True),
            dict(type='Pad',  # Padding config to pad images divisible by 32.
                 size_divisor=32),
            dict(type='DefaultFormatBundle'),  # Default format bundle to gather data in the pipeline
            dict(type='Collect',  # Collect pipeline that collect necessary keys for testing.
                 keys=['img'])
        ])
]
data = dict(
    samples_per_gpu=2,  # Batch size of a single GPU
    workers_per_gpu=2,  # Worker to pre-fetch data for each single GPU
    train=dict(  # Train dataset config
        type='DOTADataset',  # Type of dataset
        ann_file=
        '../datasets/split_1024_dota1_0/trainval/annfiles/',  # Path of annotation file
        img_prefix=
        '../datasets/split_1024_dota1_0/trainval/images/',  # Prefix of image path
        pipeline=[  # pipeline, this is passed by the train_pipeline created before.
            dict(type='LoadImageFromFile'),
            dict(type='LoadAnnotations', with_bbox=True),
            dict(type='RResize', img_scale=(1024, 1024)),
            dict(type='RRandomFlip', flip_ratio=0.5, version='oc'),
            dict(
                type='Normalize',
                mean=[123.675, 116.28, 103.53],
                std=[58.395, 57.12, 57.375],
                to_rgb=True),
            dict(type='Pad', size_divisor=32),
            dict(type='DefaultFormatBundle'),
            dict(type='Collect', keys=['img', 'gt_bboxes', 'gt_labels'])
        ],
        version='oc'),
    val=dict(  # Validation dataset config
        type='DOTADataset',
        ann_file=
        '../datasets/split_1024_dota1_0/trainval/annfiles/',
        img_prefix=
        '../datasets/split_1024_dota1_0/trainval/images/',
        pipeline=[
            dict(type='LoadImageFromFile'),
            dict(
                type='MultiScaleFlipAug',
                img_scale=(1024, 1024),
                flip=False,
                transforms=[
                    dict(type='RResize'),
                    dict(
                        type='Normalize',
                        mean=[123.675, 116.28, 103.53],
                        std=[58.395, 57.12, 57.375],
                        to_rgb=True),
                    dict(type='Pad', size_divisor=32),
                    dict(type='DefaultFormatBundle'),
                    dict(type='Collect', keys=['img'])
                ])
        ],
        version='oc'),
    test=dict(  # Test dataset config, modify the ann_file for test-dev/test submission
        type='DOTADataset',
        ann_file=
        '../datasets/split_1024_dota1_0/test/images/',
        img_prefix=
        '../datasets/split_1024_dota1_0/test/images/',
        pipeline=[  # Pipeline is passed by test_pipeline created before
            dict(type='LoadImageFromFile'),
            dict(
                type='MultiScaleFlipAug',
                img_scale=(1024, 1024),
                flip=False,
                transforms=[
                    dict(type='RResize'),
                    dict(
                        type='Normalize',
                        mean=[123.675, 116.28, 103.53],
                        std=[58.395, 57.12, 57.375],
                        to_rgb=True),
                    dict(type='Pad', size_divisor=32),
                    dict(type='DefaultFormatBundle'),
                    dict(type='Collect', keys=['img'])
                ])
        ],
        version='oc'))
evaluation = dict(  # The config to build the evaluation hook
    interval=12,  # Evaluation interval
    metric='mAP')  # Metrics used during evaluation
optimizer = dict(  # Config used to build optimizer
    type='SGD',  # Type of optimizers
    lr=0.0025,  # Learning rate of optimizers
    momentum=0.9,  # Momentum
    weight_decay=0.0001)  # Weight decay of SGD
optimizer_config = dict(  # Config used to build the optimizer hook
    grad_clip=dict(
        max_norm=35,
        norm_type=2))
lr_config = dict(  # Learning rate scheduler config used to register LrUpdater hook
    policy='step',  # The policy of scheduler
    warmup='linear',  # The warmup policy, also support `exp` and `constant`.
    warmup_iters=500,  # The number of iterations for warmup
    warmup_ratio=0.3333333333333333,  # The ratio of the starting learning rate used for warmup
    step=[8, 11])  # Steps to decay the learning rate
runner = dict(
    type='EpochBasedRunner',  # Type of runner to use (i.e. IterBasedRunner or EpochBasedRunner)
    max_epochs=12) # Runner that runs the workflow in total max_epochs. For IterBasedRunner use `max_iters`
checkpoint_config = dict(  # Config to set the checkpoint hook
    interval=12)  # The save interval is 12
log_config = dict(  # config to register logger hook
    interval=50,  # Interval to print the log
    hooks=[
        # dict(type='TensorboardLoggerHook')  # The Tensorboard logger is also supported
        dict(type='TextLoggerHook')
    ])  # The logger used to record the training process.
dist_params = dict(backend='nccl')  # Parameters to setup distributed training, the port can also be set.
log_level = 'INFO'  # The level of logging.
load_from = None  # load models as a pre-trained model from a given path. This will not resume training.
resume_from = None  # Resume checkpoints from a given path, the training will be resumed from the epoch when the checkpoint's is saved.
workflow = [('train', 1)]  # Workflow for runner. [('train', 1)] means there is only one workflow and the workflow named 'train' is executed once. The workflow trains the model by 12 epochs according to the total_epochs.
work_dir = './work_dirs/rotated_retinanet_hbb_r50_fpn_1x_dota_oc'  # Directory to save the model checkpoints and logs for the current experiments.
FAQ
Use intermediate variables in configs
Some intermediate variables are used in the configs files, like train_pipeline/test_pipeline in datasets.
It’s worth noting that when modifying intermediate variables in the children configs, user need to pass the intermediate variables into corresponding fields again.
For example, we would like to use offline multi scale strategy to train a RoI-Trans. train_pipeline are intermediate variable we would like modify.
_base_ = ['./roi_trans_r50_fpn_1x_dota_le90.py']

data_root = '../datasets/split_ms_dota1_0/'
angle_version = 'le90'
img_norm_cfg = dict(
    mean=[123.675, 116.28, 103.53], std=[58.395, 57.12, 57.375], to_rgb=True)
train_pipeline = [
    dict(type='LoadImageFromFile'),
    dict(type='LoadAnnotations', with_bbox=True),
    dict(type='RResize', img_scale=(1024, 1024)),
    dict(
        type='RRandomFlip',
        flip_ratio=[0.25, 0.25, 0.25],
        direction=['horizontal', 'vertical', 'diagonal'],
        version=angle_version),
    dict(
        type='PolyRandomRotate',
        rotate_ratio=0.5,
        angles_range=180,
        auto_bound=False,
        version=angle_version),
    dict(type='Normalize', **img_norm_cfg),
    dict(type='Pad', size_divisor=32),
    dict(type='DefaultFormatBundle'),
    dict(type='Collect', keys=['img', 'gt_bboxes', 'gt_labels'])
]
data = dict(
    train=dict(
        pipeline=train_pipeline,
        ann_file=data_root + 'trainval/annfiles/',
        img_prefix=data_root + 'trainval/images/'),
    val=dict(
        ann_file=data_root + 'trainval/annfiles/',
        img_prefix=data_root + 'trainval/images/'),
    test=dict(
        ann_file=data_root + 'test/images/',
        img_prefix=data_root + 'test/images/'))
We first define the new train_pipeline/test_pipeline and pass them into data.
Similarly, if we would like to switch from SyncBN to BN or MMSyncBN, we need to substitute every norm_cfg in the config.
_base_ = './roi_trans_r50_fpn_1x_dota_le90.py'
norm_cfg = dict(type='BN', requires_grad=True)
model = dict(
    backbone=dict(norm_cfg=norm_cfg),
    neck=dict(norm_cfg=norm_cfg),
    ...)
Tutorial 2: Customize Datasets
Support new data format
To support a new data format, you can convert them to existing formats (DOTA format). You could choose to convert them offline (before training by a script) or online (implement a new dataset and do the conversion at training). In MMRotate, we recommend to convert the data into DOTA formats and do the conversion offline, thus you only need to modify the config’s data annotation paths and classes after the conversion of your data.
Reorganize new data formats to existing format
The simplest way is to convert your dataset to existing dataset formats (DOTA).
The annotation txt files in DOTA format:
184 2875 193 2923 146 2932 137 2885 plane 0
66 2095 75 2142 21 2154 11 2107 plane 0
...
Each line represents an object and records it as a 10-dimensional array A.
A[0:8]: Polygons with format(x1, y1, x2, y2, x3, y3, x4, y4).A[8]: Category.A[9]: Difficulty.
After the data pre-processing, there are two steps for users to train the customized new dataset with existing format (e.g. DOTA format):
Modify the config file for using the customized dataset.
Check the annotations of the customized dataset.
Here we give an example to show the above two steps, which uses a customized dataset of 5 classes with COCO format to train an existing Cascade Mask R-CNN R50-FPN detector.
1. Modify the config file for using the customized dataset
There are two aspects involved in the modification of config file:
The
datafield. Specifically, you need to explicitly add theclassesfields indata.train,data.valanddata.test.The
num_classesfield in themodelpart. Explicitly over-write all thenum_classesfrom default value (e.g. 80 in COCO) to your classes number.
In configs/my_custom_config.py:
# the new config inherits the base configs to highlight the necessary modification
_base_ = './rotated_retinanet_hbb_r50_fpn_1x_dota_oc'

# 1. dataset settings
dataset_type = 'DOTADataset'
classes = ('a', 'b', 'c', 'd', 'e')
data = dict(
    samples_per_gpu=2,
    workers_per_gpu=2,
    train=dict(
        type=dataset_type,
        # explicitly add your class names to the field `classes`
        classes=classes,
        ann_file='path/to/your/train/annotation_data',
        img_prefix='path/to/your/train/image_data'),
    val=dict(
        type=dataset_type,
        # explicitly add your class names to the field `classes`
        classes=classes,
        ann_file='path/to/your/val/annotation_data',
        img_prefix='path/to/your/val/image_data'),
    test=dict(
        type=dataset_type,
        # explicitly add your class names to the field `classes`
        classes=classes,
        ann_file='path/to/your/test/annotation_data',
        img_prefix='path/to/your/test/image_data'))

# 2. model settings
model = dict(
    bbox_head=dict(
        type='RotatedRetinaHead',
        # explicitly over-write all the `num_classes` field from default 15 to 5.
        num_classes=15))
2. Check the annotations of the customized dataset
Assuming your customized dataset is DOTA format, make sure you have the correct annotations in the customized dataset:
The
classesfields in your config file should have exactly the same elements and the same order with theA[8]in txt annotations. MMRotate automatically maps the uncontinuousidincategoriesto the continuous label indices, so the string order ofnameincategoriesfield affects the order of label indices. Meanwhile, the string order ofclassesin config affects the label text during visualization of predicted bounding boxes.
Customize datasets by dataset wrappers
MMRotate also supports many dataset wrappers to mix the dataset or modify the dataset distribution for training. Currently it supports to three dataset wrappers as below:
RepeatDataset: simply repeat the whole dataset.ClassBalancedDataset: repeat dataset in a class balanced manner.ConcatDataset: concat datasets.
Repeat dataset
We use RepeatDataset as wrapper to repeat the dataset. For example, suppose the original dataset is Dataset_A, to repeat it, the config looks like the following
dataset_A_train = dict(
        type='RepeatDataset',
        times=N,
        dataset=dict(  # This is the original config of Dataset_A
            type='Dataset_A',
            ...
            pipeline=train_pipeline
        )
    )
Class balanced dataset
We use ClassBalancedDataset as wrapper to repeat the dataset based on category
frequency. The dataset to repeat needs to instantiate function self.get_cat_ids(idx)
to support ClassBalancedDataset.
For example, to repeat Dataset_A with oversample_thr=1e-3, the config looks like the following
dataset_A_train = dict(
        type='ClassBalancedDataset',
        oversample_thr=1e-3,
        dataset=dict(  # This is the original config of Dataset_A
            type='Dataset_A',
            ...
            pipeline=train_pipeline
        )
    )
Concatenate dataset
There are three ways to concatenate the dataset.
If the datasets you want to concatenate are in the same type with different annotation files, you can concatenate the dataset configs like the following.
dataset_A_train = dict(
    type='Dataset_A',
    ann_file = ['anno_file_1', 'anno_file_2'],
    pipeline=train_pipeline
)
If the concatenated dataset is used for test or evaluation, this manner supports to evaluate each dataset separately. To test the concatenated datasets as a whole, you can set
separate_eval=Falseas below.dataset_A_train = dict( type='Dataset_A', ann_file = ['anno_file_1', 'anno_file_2'], separate_eval=False, pipeline=train_pipeline )
In case the dataset you want to concatenate is different, you can concatenate the dataset configs like the following.
dataset_A_train = dict()
dataset_B_train = dict()

data = dict(
    imgs_per_gpu=2,
    workers_per_gpu=2,
    train = [
        dataset_A_train,
        dataset_B_train
    ],
    val = dataset_A_val,
    test = dataset_A_test
    )
If the concatenated dataset is used for test or evaluation, this manner also supports to evaluate each dataset separately.
We also support to define
ConcatDatasetexplicitly as the following.dataset_A_val = dict() dataset_B_val = dict() data = dict( imgs_per_gpu=2, workers_per_gpu=2, train=dataset_A_train, val=dict( type='ConcatDataset', datasets=[dataset_A_val, dataset_B_val], separate_eval=False))
This manner allows users to evaluate all the datasets as a single one by setting
separate_eval=False.
Note:
The option
separate_eval=Falseassumes the datasets useself.data_infosduring evaluation. Therefore, COCO datasets do not support this behavior since COCO datasets do not fully rely onself.data_infosfor evaluation. Combining different types of datasets and evaluating them as a whole is not tested thus is not suggested.Evaluating
ClassBalancedDatasetandRepeatDatasetis not supported thus evaluating concatenated datasets of these types is also not supported.
A more complex example that repeats Dataset_A and Dataset_B by N and M times, respectively, and then concatenates the repeated datasets is as the following.
dataset_A_train = dict(
    type='RepeatDataset',
    times=N,
    dataset=dict(
        type='Dataset_A',
        ...
        pipeline=train_pipeline
    )
)
dataset_A_val = dict(
    ...
    pipeline=test_pipeline
)
dataset_A_test = dict(
    ...
    pipeline=test_pipeline
)
dataset_B_train = dict(
    type='RepeatDataset',
    times=M,
    dataset=dict(
        type='Dataset_B',
        ...
        pipeline=train_pipeline
    )
)
data = dict(
    imgs_per_gpu=2,
    workers_per_gpu=2,
    train = [
        dataset_A_train,
        dataset_B_train
    ],
    val = dataset_A_val,
    test = dataset_A_test
)
Tutorial 3: Customize Models
We basically categorize model components into 5 types.
backbone: usually an FCN network to extract feature maps, e.g., ResNet, Swin.
neck: the component between backbones and heads, e.g., FPN, ReFPN.
head: the component for specific tasks, e.g., bbox prediction.
roi extractor: the part for extracting RoI features from feature maps, e.g., RoI Align Rotated.
loss: the component in head for calculating losses, e.g., FocalLoss, GWDLoss, and KFIoULoss.
Develop new components
Add a new backbone
Here we show how to develop new components with an example of MobileNet.
1. Define a new backbone (e.g. MobileNet)
Create a new file mmrotate/models/backbones/mobilenet.py.
import torch.nn as nn

from mmrotate.models.builder import ROTATED_BACKBONES


@ROTATED_BACKBONES.register_module()
class MobileNet(nn.Module):

    def __init__(self, arg1, arg2):
        pass

    def forward(self, x):  # should return a tuple
        pass
2. Import the module
You can either add the following line to mmrotate/models/backbones/__init__.py
from .mobilenet import MobileNet
or alternatively add
custom_imports = dict(
    imports=['mmrotate.models.backbones.mobilenet'],
    allow_failed_imports=False)
to the config file to avoid modifying the original code.
3. Use the backbone in your config file
model = dict(
    ...
    backbone=dict(
        type='MobileNet',
        arg1=xxx,
        arg2=xxx),
    ...
Add new necks
1. Define a neck (e.g. PAFPN)
Create a new file mmrotate/models/necks/pafpn.py.
from mmrotate.models.builder import ROTATED_NECKS

@ROTATED_NECKS.register_module()
class PAFPN(nn.Module):

    def __init__(self,
                in_channels,
                out_channels,
                num_outs,
                start_level=0,
                end_level=-1,
                add_extra_convs=False):
        pass

    def forward(self, inputs):
        # implementation is ignored
        pass
2. Import the module
You can either add the following line to mmrotate/models/necks/__init__.py,
from .pafpn import PAFPN
or alternatively add
custom_imports = dict(
    imports=['mmrotate.models.necks.pafpn.py'],
    allow_failed_imports=False)
to the config file and avoid modifying the original code.
3. Modify the config file
neck=dict(
    type='PAFPN',
    in_channels=[256, 512, 1024, 2048],
    out_channels=256,
    num_outs=5)
Add new heads
Here we show how to develop a new head with the example of Double Head R-CNN as the following.
First, add a new bbox head in mmrotate/models/roi_heads/bbox_heads/double_bbox_head.py.
Double Head R-CNN implements a new bbox head for object detection.
To implement a bbox head, basically we need to implement three functions of the new module as the following.
from mmrotate.models.builder import ROTATED_HEADS
from mmrotate.models.roi_heads.bbox_heads.bbox_head import BBoxHead

@ROTATED_HEADS.register_module()
class DoubleConvFCBBoxHead(BBoxHead):
    r"""Bbox head used in Double-Head R-CNN

                                      /-> cls
                  /-> shared convs ->
                                      \-> reg
    roi features
                                      /-> cls
                  \-> shared fc    ->
                                      \-> reg
    """  # noqa: W605

    def __init__(self,
                 num_convs=0,
                 num_fcs=0,
                 conv_out_channels=1024,
                 fc_out_channels=1024,
                 conv_cfg=None,
                 norm_cfg=dict(type='BN'),
                 **kwargs):
        kwargs.setdefault('with_avg_pool', True)
        super(DoubleConvFCBBoxHead, self).__init__(**kwargs)


    def forward(self, x_cls, x_reg):
Second, implement a new RoI Head if it is necessary. We plan to inherit the new DoubleHeadRoIHead from StandardRoIHead. We can find that a StandardRoIHead already implements the following functions.
import torch

from mmdet.core import bbox2result, bbox2roi, build_assigner, build_sampler
from mmrotate.models.builder import ROTATED_HEADS, build_head, build_roi_extractor
from mmrotate.models.roi_heads.base_roi_head import BaseRoIHead
from mmrotate.models.roi_heads.test_mixins import BBoxTestMixin, MaskTestMixin


@ROTATED_HEADS.register_module()
class StandardRoIHead(BaseRoIHead, BBoxTestMixin, MaskTestMixin):
    """Simplest base roi head including one bbox head and one mask head.
    """

    def init_assigner_sampler(self):

    def init_bbox_head(self, bbox_roi_extractor, bbox_head):

    def forward_dummy(self, x, proposals):


    def forward_train(self,
                      x,
                      img_metas,
                      proposal_list,
                      gt_bboxes,
                      gt_labels,
                      gt_bboxes_ignore=None,
                      gt_masks=None):

    def _bbox_forward(self, x, rois):

    def _bbox_forward_train(self, x, sampling_results, gt_bboxes, gt_labels,
                            img_metas):

    def simple_test(self,
                    x,
                    proposal_list,
                    img_metas,
                    proposals=None,
                    rescale=False):
        """Test without augmentation."""
Double Head’s modification is mainly in the bbox_forward logic, and it inherits other logics from the StandardRoIHead.
In the mmrotate/models/roi_heads/double_roi_head.py, we implement the new RoI Head as the following:
from mmrotate.models.builder import ROTATED_HEADS
from mmrotate.models.roi_heads.standard_roi_head import StandardRoIHead


@ROTATED_HEADS.register_module()
class DoubleHeadRoIHead(StandardRoIHead):
    """RoI head for Double Head RCNN

    https://arxiv.org/abs/1904.06493
    """

    def __init__(self, reg_roi_scale_factor, **kwargs):
        super(DoubleHeadRoIHead, self).__init__(**kwargs)
        self.reg_roi_scale_factor = reg_roi_scale_factor

    def _bbox_forward(self, x, rois):
        bbox_cls_feats = self.bbox_roi_extractor(
            x[:self.bbox_roi_extractor.num_inputs], rois)
        bbox_reg_feats = self.bbox_roi_extractor(
            x[:self.bbox_roi_extractor.num_inputs],
            rois,
            roi_scale_factor=self.reg_roi_scale_factor)
        if self.with_shared_head:
            bbox_cls_feats = self.shared_head(bbox_cls_feats)
            bbox_reg_feats = self.shared_head(bbox_reg_feats)
        cls_score, bbox_pred = self.bbox_head(bbox_cls_feats, bbox_reg_feats)

        bbox_results = dict(
            cls_score=cls_score,
            bbox_pred=bbox_pred,
            bbox_feats=bbox_cls_feats)
        return bbox_results
Last, the users need to add the module in
mmrotate/models/bbox_heads/__init__.py and mmrotate/models/roi_heads/__init__.py thus the corresponding registry could find and load them.
Alternatively, the users can add
custom_imports=dict(
    imports=['mmrotate.models.roi_heads.double_roi_head', 'mmrotate.models.bbox_heads.double_bbox_head'])
to the config file and achieve the same goal.
Add new loss
Assume you want to add a new loss as MyLoss, for bounding box regression.
To add a new loss function, the users need implement it in mmrotate/models/losses/my_loss.py.
The decorator weighted_loss enable the loss to be weighted for each element.
import torch
import torch.nn as nn

from mmrotate.models.builder import ROTATED_LOSSES
from mmdet.models.losses.utils import weighted_loss

@weighted_loss
def my_loss(pred, target):
    assert pred.size() == target.size() and target.numel() > 0
    loss = torch.abs(pred - target)
    return loss

@ROTATED_LOSSES.register_module()
class MyLoss(nn.Module):

    def __init__(self, reduction='mean', loss_weight=1.0):
        super(MyLoss, self).__init__()
        self.reduction = reduction
        self.loss_weight = loss_weight

    def forward(self,
                pred,
                target,
                weight=None,
                avg_factor=None,
                reduction_override=None):
        assert reduction_override in (None, 'none', 'mean', 'sum')
        reduction = (
            reduction_override if reduction_override else self.reduction)
        loss_bbox = self.loss_weight * my_loss(
            pred, target, weight, reduction=reduction, avg_factor=avg_factor)
        return loss_bbox
Then the users need to add it in the mmrotate/models/losses/__init__.py.
from .my_loss import MyLoss, my_loss
Alternatively, you can add
custom_imports=dict(
    imports=['mmrotate.models.losses.my_loss'])
to the config file and achieve the same goal.
To use it, modify the loss_xxx field.
Since MyLoss is for regression, you need to modify the loss_bbox field in the head.
loss_bbox=dict(type='MyLoss', loss_weight=1.0))
Tutorial 4: Customize Runtime Settings
Customize optimization settings
Customize optimizer supported by Pytorch
We already support to use all the optimizers implemented by PyTorch, and the only modification is to change the optimizer field of config files.
For example, if you want to use ADAM (note that the performance could drop a lot), the modification could be as the following.
optimizer = dict(type='Adam', lr=0.0003, weight_decay=0.0001)
To modify the learning rate of the model, the users only need to modify the lr in the config of optimizer. The users can directly set arguments following the API doc of PyTorch.
Customize self-implemented optimizer
1. Define a new optimizer
A customized optimizer could be defined as following.
Assume you want to add a optimizer named MyOptimizer, which has arguments a, b, and c.
You need to create a new directory named mmrotate/core/optimizer.
And then implement the new optimizer in a file, e.g., in mmrotate/core/optimizer/my_optimizer.py:
from mmdet.core.optimizer.registry import OPTIMIZERS
from torch.optim import Optimizer


@OPTIMIZERS.register_module()
class MyOptimizer(Optimizer):

    def __init__(self, a, b, c)
2. Add the optimizer to registry
To find the above module defined above, this module should be imported into the main namespace at first. There are two options to achieve it.
Modify
mmrotate/core/optimizer/__init__.pyto import it.The newly defined module should be imported in
mmrotate/core/optimizer/__init__.pyso that the registry will find the new module and add it:
from .my_optimizer import MyOptimizer
Use
custom_importsin the config to manually import it
custom_imports = dict(imports=['mmrotate.core.optimizer.my_optimizer'], allow_failed_imports=False)
The module mmrotate.core.optimizer.my_optimizer will be imported at the beginning of the program and the class MyOptimizer is then automatically registered.
Note that only the package containing the class MyOptimizer should be imported.
mmrotate.core.optimizer.my_optimizer.MyOptimizer cannot be imported directly.
Actually users can use a totally different file directory structure using this importing method, as long as the module root can be located in PYTHONPATH.
3. Specify the optimizer in the config file
Then you can use MyOptimizer in optimizer field of config files.
In the configs, the optimizers are defined by the field optimizer like the following:
optimizer = dict(type='SGD', lr=0.02, momentum=0.9, weight_decay=0.0001)
To use your own optimizer, the field can be changed to
optimizer = dict(type='MyOptimizer', a=a_value, b=b_value, c=c_value)
Customize optimizer constructor
Some models may have some parameter-specific settings for optimization, e.g. weight decay for BatchNorm layers. The users can do those fine-grained parameter tuning through customizing optimizer constructor.
from mmcv.utils import build_from_cfg

from mmcv.runner.optimizer import OPTIMIZER_BUILDERS, OPTIMIZERS
from mmrotate.utils import get_root_logger
from .my_optimizer import MyOptimizer


@OPTIMIZER_BUILDERS.register_module()
class MyOptimizerConstructor(object):

    def __init__(self, optimizer_cfg, paramwise_cfg=None):

    def __call__(self, model):

        return my_optimizer
The default optimizer constructor is implemented here, which could also serve as a template for new optimizer constructor.
Additional settings
Tricks not implemented by the optimizer should be implemented through optimizer constructor (e.g., set parameter-wise learning rates) or hooks. We list some common settings that could stabilize the training or accelerate the training. Feel free to create PR, issue for more settings.
Use gradient clip to stabilize training: Some models need gradient clip to clip the gradients to stabilize the training process. An example is as below:
optimizer_config = dict(
    _delete_=True, grad_clip=dict(max_norm=35, norm_type=2))
If your config inherits the base config which already sets the
optimizer_config, you might need_delete_=Trueto override the unnecessary settings. See the config documentation for more details.Use momentum schedule to accelerate model convergence: We support momentum scheduler to modify model’s momentum according to learning rate, which could make the model converge in a faster way. Momentum scheduler is usually used with LR scheduler, for example, the following config is used in 3D detection to accelerate convergence. For more details, please refer to the implementation of CyclicLrUpdater and CyclicMomentumUpdater.
lr_config = dict(
    policy='cyclic',
    target_ratio=(10, 1e-4),
    cyclic_times=1,
    step_ratio_up=0.4,
)
momentum_config = dict(
    policy='cyclic',
    target_ratio=(0.85 / 0.95, 1),
    cyclic_times=1,
    step_ratio_up=0.4,
)
Customize training schedules
By default we use step learning rate with 1x schedule, this calls StepLRHook in MMCV.
We support many other learning rate schedule here, such as CosineAnnealing and Poly schedule. Here are some examples
Poly schedule:
lr_config = dict(policy='poly', power=0.9, min_lr=1e-4, by_epoch=False)
ConsineAnnealing schedule:
lr_config = dict(
    policy='CosineAnnealing',
    warmup='linear',
    warmup_iters=1000,
    warmup_ratio=1.0 / 10,
    min_lr_ratio=1e-5)
Customize workflow
Workflow is a list of (phase, epochs) to specify the running order and epochs. By default it is set to be
workflow = [('train', 1)]
which means running 1 epoch for training. Sometimes user may want to check some metrics (e.g. loss, accuracy) about the model on the validate set. In such case, we can set the workflow as
[('train', 1), ('val', 1)]
so that 1 epoch for training and 1 epoch for validation will be run iteratively.
Note:
The parameters of model will not be updated during val epoch.
Keyword
total_epochsin the config only controls the number of training epochs and will not affect the validation workflow.Workflows
[('train', 1), ('val', 1)]and[('train', 1)]will not change the behavior ofEvalHookbecauseEvalHookis called byafter_train_epochand validation workflow only affect hooks that are called throughafter_val_epoch. Therefore, the only difference between[('train', 1), ('val', 1)]and[('train', 1)]is that the runner will calculate losses on validation set after each training epoch.
Customize hooks
Customize self-implemented hooks
1. Implement a new hook
There are some occasions when the users might need to implement a new hook. MMRotate supports customized hooks in training. Thus the users could implement a hook directly in mmrotate or their mmdet-based codebases and use the hook by only modifying the config in training. Here we give an example of creating a new hook in mmrotate and using it in training.
from mmcv.runner import HOOKS, Hook


@HOOKS.register_module()
class MyHook(Hook):

    def __init__(self, a, b):
        pass

    def before_run(self, runner):
        pass

    def after_run(self, runner):
        pass

    def before_epoch(self, runner):
        pass

    def after_epoch(self, runner):
        pass

    def before_iter(self, runner):
        pass

    def after_iter(self, runner):
        pass
Depending on the functionality of the hook, the users need to specify what the hook will do at each stage of the training in before_run, after_run, before_epoch, after_epoch, before_iter, and after_iter.
2. Register the new hook
Then we need to make MyHook imported. Assuming the file is in mmrotate/core/utils/my_hook.py there are two ways to do that:
Modify
mmrotate/core/utils/__init__.pyto import it.The newly defined module should be imported in
mmrotate/core/utils/__init__.pyso that the registry will find the new module and add it:
from .my_hook import MyHook
Use
custom_importsin the config to manually import it
custom_imports = dict(imports=['mmrotate.core.utils.my_hook'], allow_failed_imports=False)
3. Modify the config
custom_hooks = [
    dict(type='MyHook', a=a_value, b=b_value)
]
You can also set the priority of the hook by adding key priority to 'NORMAL' or 'HIGHEST' as below
custom_hooks = [
    dict(type='MyHook', a=a_value, b=b_value, priority='NORMAL')
]
By default the hook’s priority is set as NORMAL during registration.
Use hooks implemented in MMCV
If the hook is already implemented in MMCV, you can directly modify the config to use the hook as below
4. Example: NumClassCheckHook
We implement a customized hook named NumClassCheckHook to check whether the num_classes in head matches the length of CLASSSES in dataset.
We set it in default_runtime.py.
custom_hooks = [dict(type='NumClassCheckHook')]
Modify default runtime hooks
There are some common hooks that are not registered through custom_hooks, they are
log_config
checkpoint_config
evaluation
lr_config
optimizer_config
momentum_config
In those hooks, only the logger hook has the VERY_LOW priority, others’ priority are NORMAL.
The above-mentioned tutorials already covers how to modify optimizer_config, momentum_config, and lr_config.
Here we reveals how what we can do with log_config, checkpoint_config, and evaluation.
Checkpoint config
The MMCV runner will use checkpoint_config to initialize CheckpointHook.
checkpoint_config = dict(interval=1)
The users could set max_keep_ckpts to only save only small number of checkpoints or decide whether to store state dict of optimizer by save_optimizer. More details of the arguments are here
Log config
The log_config wraps multiple logger hooks and enables to set intervals. Now MMCV supports WandbLoggerHook, MlflowLoggerHook, and TensorboardLoggerHook.
The detail usages can be found in the doc.
log_config = dict(
    interval=50,
    hooks=[
        dict(type='TextLoggerHook'),
        dict(type='TensorboardLoggerHook')
    ])
Changelog
Frequently Asked Questions
We list some common troubles faced by many users and their corresponding solutions here. Feel free to enrich the list if you find any frequent issues and have ways to help others to solve them. If the contents here do not cover your issue, please create an issue using the provided templates and make sure you fill in all required information in the template.
MMCV Installation
Compatibility issue between MMCV and MMDetection; “ConvWS is already registered in conv layer”; “AssertionError: MMCV==xxx is used but incompatible. Please install mmcv>=xxx, <=xxx.”
Please install the correct version of MMCV for the version of your MMDetection following the installation instruction.
“No module named ‘mmcv.ops’”; “No module named ‘mmcv._ext’”.
Uninstall existing mmcv in the environment using
pip uninstall mmcv.Install mmcv-full following the installation instruction.
PyTorch/CUDA Environment
“invalid device function” or “no kernel image is available for execution”.
Check if your cuda runtime version (under
/usr/local/),nvcc --versionandconda list cudatoolkitversion match.Run
python mmdet/utils/collect_env.pyto check whether PyTorch, torchvision, and MMCV are built for the correct GPU architecture. You may need to setTORCH_CUDA_ARCH_LISTto reinstall MMCV. The GPU arch table could be found here, i.e. runTORCH_CUDA_ARCH_LIST=7.0 pip install mmcv-fullto build MMCV for Volta GPUs. The compatibility issue could happen when using old GPUS, e.g., Tesla K80 (3.7) on colab.Check whether the running environment is the same as that when mmcv/mmdet has compiled. For example, you may compile mmcv using CUDA 10.0 but run it on CUDA 9.0 environments.
“undefined symbol” or “cannot open xxx.so”.
If those symbols are CUDA/C++ symbols (e.g., libcudart.so or GLIBCXX), check whether the CUDA/GCC runtimes are the same as those used for compiling mmcv, i.e. run
python mmdet/utils/collect_env.pyto see if"MMCV Compiler"/"MMCV CUDA Compiler"is the same as"GCC"/"CUDA_HOME".If those symbols are PyTorch symbols (e.g., symbols containing caffe, aten, and TH), check whether the PyTorch version is the same as that used for compiling mmcv.
Run
python mmdet/utils/collect_env.pyto check whether PyTorch, torchvision, and MMCV are built by and running on the same environment.
setuptools.sandbox.UnpickleableException: DistutilsSetupError(“each element of ‘ext_modules’ option must be an Extension instance or 2-tuple”)
If you are using miniconda rather than anaconda, check whether Cython is installed as indicated in #3379. You need to manually install Cython first and then run command
pip install -r requirements.txt.You may also need to check the compatibility between the
setuptools,Cython, andPyTorchin your environment.
“Segmentation fault”.
Check you GCC version and use GCC 5.4. This usually caused by the incompatibility between PyTorch and the environment (e.g., GCC < 4.9 for PyTorch). We also recommend the users to avoid using GCC 5.5 because many feedbacks report that GCC 5.5 will cause “segmentation fault” and simply changing it to GCC 5.4 could solve the problem.
Check whether PyTorch is correctly installed and could use CUDA op, e.g. type the following command in your terminal.
python -c 'import torch; print(torch.cuda.is_available())'And see whether they could correctly output results.
If Pytorch is correctly installed, check whether MMCV is correctly installed.
python -c 'import mmcv; import mmcv.ops'If MMCV is correctly installed, then there will be no issue of the above two commands.
If MMCV and Pytorch is correctly installed, you man use
ipdb,pdbto set breakpoints or directly add ‘print’ in mmdetection code and see which part leads the segmentation fault.
Training
“Loss goes Nan”
Check if the dataset annotations are valid: zero-size bounding boxes will cause the regression loss to be Nan due to the commonly used transformation for box regression. Some small size (width or height are smaller than 1) boxes will also cause this problem after data augmentation (e.g., instaboost). So check the data and try to filter out those zero-size boxes and skip some risky augmentations on the small-size boxes when you face the problem.
Reduce the learning rate: the learning rate might be too large due to some reasons, e.g., change of batch size. You can rescale them to the value that could stably train the model.
Extend the warmup iterations: some models are sensitive to the learning rate at the start of the training. You can extend the warmup iterations, e.g., change the
warmup_itersfrom 500 to 1000 or 2000.Add gradient clipping: some models requires gradient clipping to stabilize the training process. The default of
grad_clipisNone, you can add gradient clippint to avoid gradients that are too large, i.e., setoptimizer_config=dict(_delete_=True, grad_clip=dict(max_norm=35, norm_type=2))in your config file. If your config does not inherits from any basic config that containsoptimizer_config=dict(grad_clip=None), you can simply addoptimizer_config=dict(grad_clip=dict(max_norm=35, norm_type=2)).
’GPU out of memory”
There are some scenarios when there are large amounts of ground truth boxes, which may cause OOM during target assignment. You can set
gpu_assign_thr=Nin the config of assigner thus the assigner will calculate box overlaps through CPU when there are more than N GT boxes.Set
with_cp=Truein the backbone. This uses the sublinear strategy in PyTorch to reduce GPU memory cost in the backbone.Try mixed precision training using following the examples in
config/fp16. Theloss_scalemight need further tuning for different models.
“RuntimeError: Expected to have finished reduction in the prior iteration before starting a new one”
This error indicates that your module has parameters that were not used in producing loss. This phenomenon may be caused by running different branches in your code in DDP mode.
You can set
find_unused_parameters = Truein the config to solve the above problems or find those unused parameters manually.
Evaluation
COCO Dataset, AP or AR = -1
According to the definition of COCO dataset, the small and medium areas in an image are less than 1024 (32*32), 9216 (96*96), respectively.
If the corresponding area has no object, the result of AP and AR will set to -1.
mmrotate
mmrotate.core
mmrotate.datasets
- class mmrotate.datasets.DOTADataset(ann_file, pipeline, version='oc', difficulty=100, **kwargs)[source]
DOTA dataset for detection.
- Parameters
ann_file (str) – Annotation file path.
pipeline (list[dict]) – Processing pipeline.
version (str, optional) – Angle representations. Defaults to ‘oc’.
difficulty (bool, optional) – The difficulty threshold of GT.
- evaluate(results, metric='mAP', logger=None, proposal_nums=(100, 300, 1000), iou_thr=0.5, scale_ranges=None)[source]
Evaluate the dataset.
- Parameters
results (list) – Testing results of the dataset.
metric (str | list[str]) – Metrics to be evaluated.
logger (logging.Logger | None | str) – Logger used for printing related information during evaluation. Default: None.
proposal_nums (Sequence[int]) – Proposal number used for evaluating recalls, such as recall@100, recall@1000. Default: (100, 300, 1000).
iou_thr (float | list[float]) – IoU threshold. It must be a float when evaluating mAP, and can be a list when evaluating recall. Default: 0.5.
scale_ranges (list[tuple] | None) – Scale ranges for evaluating mAP. Default: None.
- format_results(results, submission_dir=None, **kwargs)[source]
Format the results to submission text (standard format for DOTA evaluation).
- Parameters
results (list) – Testing results of the dataset.
submission_dir (str, optional) – The folder that contains submission
files. – If not specified, a temp folder will be created. Default: None.
- Returns
- (result_files, tmp_dir), result_files is a dict containing
the json filepaths, tmp_dir is the temporal directory created for saving json files when submission_dir is not specified.
- Return type
tuple